
Create a dsc configuration repository
Abstract
The Microsoft PowerShell DSC Team has provided a GitHub repository DscConfigurations which, together with the community, will provide a structured list, or a connection point if you will, for community created DSC configurations.
This blog post is the first of a series that will explain how to create a DSC configuration repository using the templates and common tests provided in the DscConfigurations repository.
We will setup a DSC configuration that will configure two target nodes (servers), where the first configuration will create and configure a local group on the first server, and on the second server we will change the power plan.
Preparations
This assumes that you have all the required software installed on the client you will be working on, and that you have all the necessary accounts on dependent services.
This blog post is only tested on Windows, but will hopefully work on any platform with PowerShell installed.
Services that are required
- An Azure subscription with administrator permission.
- GitHub free account.
- AppVeyor free account
GitHub and AppVeyor are free for public open source repositories. For this you only need a free account, since the whole point of this is that this repository should be publicly shared with and by the community.
An Azure subscription comes in different forms, you can get a 30-day trial, or you get one through the MSDN subscription, or maybe your company has a subscription that you are allowed to use. To test this, it’s enough to have the trial, for a real project I would recommended having an MSDN subscription.
Software that are required on the client
- Git (can be downloaded here).
- Your favorite text editor (Or Visual Studio Code which I think is awesome, and free on every platform).
- AzureRm PowerShell Modules (see this article Install and configure Azure PowerShell on how to install the modules).
Properties used by this article
There are some properties that you can or must change in the steps below. Make sure to use the same values throughout the steps.
- Public repository name: DscConfigurationExample
- Local root path for local repositories: c:\source
- Tenant ID for the Azure subscription.
- Subscription ID for the Azure subscription.
- Application ID for the Azure Active Directory application registration (in the Azure subscription).
- Application password (key) for the Azure Active Directory application registration above.
Note: The repository name must not contain a hyphen (‘-‘) because that will (currently) not be allowed when your configuration is uploaded to Azure Automation. See issue PowerShell/TemplateConfig#7 for more information.
How to set up a repository using the templates and common tests
Prepare a repository with the template
If you don’t already have and account on GitHub then please register for a free account.
- Browse to GitHub and log in.
- Create a new repository named ‘DscConfigurationExample’.
- Add an optional description (can be left empty).
- Leave the repository type as ‘Public’.
- Check the box for ‘Initialize this repository with a README’.
- Leave the choice for “.gitignore” as ‘None’.
- Add correct license for your repository, normally MIT is used for Open Source Software (OSS).
-
Clone the repository locally. This will make a local copy of the repository on your hard drive. Please replace USERNAME with you github account username, for example, my account username is ‘johlju’.
cd 'c:\source' git clone https://github.com/USERNAME/DscConfigurationExample -
Clone the template repository locally.
cd 'c:\source' git clone https://github.com/PowerShell/TemplateConfig -
Copy everything except the LICENSE and README.md from the template folder.
cd c:\source $copyItemParameters = @{ Path = '.\TemplateConfig\*' Destination = '.\DscConfigurationExample' Exclude = 'LICENSE','README.md' Recurse = $true } Copy-Item @copyItemParameters -
Enter you newly cloned repository
cd 'DscConfigurationExample' -
Start you favorite code editor. I will assume VS Code
 .
If you are using any other editor, please open the project (repository) at this
folder location ‘c:\source\DscConfigurationExample’.
.
If you are using any other editor, please open the project (repository) at this
folder location ‘c:\source\DscConfigurationExample’.code . -
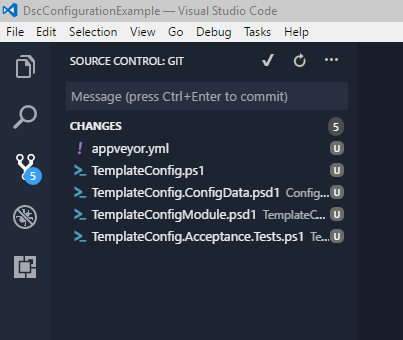
If everything is correct, it should look like this.
In the PowerShell console running git.
git status -uOn branch master Your branch is up-to-date with 'origin/master'. Untracked files: (use "git add <file>..." to include in what will be committed) ConfigurationData/TemplateConfig.ConfigData.psd1 TemplateConfig.ps1 TemplateConfigModule/TemplateConfigModule.psd1 TemplateConfigModule/Tests/Acceptance/TemplateConfig.Acceptance.Tests.ps1 appveyor.yml nothing added to commit but untracked files present (use "git add" to track)In Visual Studio Code click on the Source Control icon (
 ).
).
Preparing Azure subscription
If you don’t already have an Azure subscription then then please register for a 30-day trial Azure subscription.
We need a new Azure Active Directory Application account that will be used to login to Azure, it needs to have the correct permission to create the resources being used during testing. Currently that permission needs to be Contributor on the entire subscription.
There are two ways to create the requirements for running the tests. I will show both methods.
Prepare Azure using Azure Portal
- Login in to the Azure Portal.
- Create the Azure Active Directory application account.
- Go to Azure Active Directory. I assume you are in the correct directory, if not, change to the correct directory.
- Click on App registrations.
- Click on New application registration.
- Enter a descriptive name in the Name field. For example ‘DscConfigurationExampleAppId’. This name is only for your records, and will only be used for setting permission later..
- Leave Application type as Web app / API.
- For the mandatory field Sign-on URL enter any URL. For example
https://dummy. This URL is not of interest since it will not be used. - Click on Create.
- On the list of application registrations, click on the newly created application.
- In the blade, look for Application ID and save this somewhere as your application id. We need this in a later step. Application ID looks something like this; ‘ed978ce1-4d9c-4cd0-9374-4888e0fcab36’.
- On the Settings blade, click on Keys.
- Add a descriptive key description in the Description field. For example ‘DscConfigurationExampleAppPassword’.
- Choose when the key password will expire, in the Expires field. For example ‘In 1 year’.
- Click Save, and please, keep the blade open until you completed the following steps.
-
From the value field, copy the password key to a secure location, for example a password manager. We need this in a later step. The password will look something like this ‘B5zwEx6B+fj92mEk5LC7IPa4P+d28NY7QuqhLP1Dehs=’.
Note: When leaving this blade you will not be able to see the key password again. If you do then you need to create a new key password and optionally delete the old one.
- Copy the Tenant ID and save this somewhere. We need this in a later step.
- Go back to Azure Active Directory.
- Click on Properties.
- Look for the field Directory ID, this value is the same as your Tenant ID. Copy the Directory ID and save this somewhere as your tenant id. Tenant ID looks something like this; ‘84a06b73-5842-4d03-8123-ee27708b7f36’.
- Copy the Subscription ID and save this somewhere. We need this in a later
step.
-
Go to Subscriptions (same place as Azure Active Directory)
Note: If you don’t see subscriptions in the list, then you need to click on More services and search for Subscriptions.
-
Look for the field Subscription ID column. Copy and save this somewhere as your subscription id. Subscription ID looks something like this; ‘4de0edba-1816-4f9b-880f-db90ee863d11’.
-
- Set the required permission for the Azure Active Directory Application on the
subscription.
- While still in the subscriptions list, please click on the subscription with the same id as you copied above.
- Click on Access control (IAM).
- Click Add.
- In the field Role select Contributor.
- In the field Select (the search box), write the name of the Azure Active Directory Application, for example ‘DscConfigurationExampleAppId’.
- When the name of the Azure Active Directory Application returns in search result, click on the name to move it to selected members.
- Click Save.
Prepare Azure using PowerShell
For this we are going to use the script that @PlagueHO created here with some minor modifications. We will use the modified script here.
The script will login to Azure and create a new Azure Active Directory application account and give the application account Contributor permission on the subscription.
-
Copy the script to a script file named ‘New-AzureServicePrincipal.ps1’.
- Start a PowerShell session and change the directory to the location where you save the script file ‘New-AzureServicePrincipal.ps1’.
- If you already know your subscription id, skip to the next step.
-
Run the following in the PowerShell session
Login-AzureRmAccount Get-AzureRmSubscription -
Look for the Id property, this is the Subscription ID. Copy the Subscription ID and save this somewhere. Subscription ID looks something like this; ‘4de0edba-1816-4f9b-880f-db90ee863d11’.
-
- Run the following in the PowerShell session.
-
Change variable
$azureActiveDirectoryApplicationNameto something descriptive.Note: The application name is only for your records, it will only show as the account having permission on the subscription.
- Change variable
$azureSubscriptionIdto the subscription id copied in the previous step. -
Change variable
$azureDomainto your domain name (this is optional).Note: Domain is used to build the URL for the parameters home page and identifiers URI but is is not of interest since it will not be used.
- When the script is run, you will be asked for a password. This is the password key that will will need later to login using the application account. Save the password key to a secure location, for example a password manager.
$azureActiveDirectoryApplicationName = 'DscConfigurationExampleAppId' $azureSubscriptionId = '4de0edba-1816-4f9b-880f-db90ee863d11' $azureDomain = 'dummy' $getCredentialParameters = @{ Message = 'Azure Active Directory Application password' UserName = $azureActiveDirectoryApplicationName } $applicationCredential = Get-Credential @getCredentialParameters $newAzureServicePrincipalParameters = @{ Name = $azureActiveDirectoryApplicationName SubscriptionId = $azureSubscriptionId ADDomain = $azureDomain ApplicationPassword = $applicationCredential.Password } .\New-AzureServicePrincipal.ps1 @newAzureServicePrincipalParameters -
-
When
New-AzureServicePrincipalsuccessfully finishes it returns a hash table with values that we will need later. Please save these for later use. The result will look something like this.Name Value ---- ----- SubscriptionID 4de0edba-1816-4f9b-880f-db90ee863d11 ApplicationID ed978ce1-4d9c-4cd0-9374-4888e0fcab36 TenantID 84a06b73-5842-4d03-8123-ee27708b7f36
Configure AppVeyor for running tests
If you not already have and account on AppVeyor then please register for a free account.
Add repository as a AppVeyor project
- Login in to AppVeyor
- Once in AppVeyor, add the project.
- Go to the Project tab.
- Click New Project.
- Choose GitHub
- Hover over ‘DscConfigurationExample’ and click on Add.
Move encrypted environment variables to
If we look in the repository that we created above, the file appveyor.yml has all the id’s and password in that file. Even if they are stored encrypted, that is not best security wise. Instead we need to remove the secure variables from the appveyor.yml file and add them to your AppVeyor account.
Note: If you want to keep the ID’s and password encrypted in the appveyor.yml file, then you should encrypt the strings using Encrypt configuration data. If you choose to keep the values in appveyor.yml, then you can skip this step.
- Go back to your project in Visual Studio Code (or whatever editor you are using).
-
Remove the following block from the appveyor.yml.
ApplicationID: secure: mHB9K9ItLkpdxUR7WgBnuBiBOl3qgJT1yizvFZDOgkRxvTV5KoZJ8QuAp+F+EbV0 SubscriptionID: secure: fhB5mHXLFRRc1/iwqCA9ibCqwg7qKqkayknhebLsM+FdlrmL80HCRm1vJYafomei TenantID: secure: J/my7xsOE9jewR0DDhD+EU5jeo5Bp83/nmIK8a8QI0QLoZXStCOtk1vUjVsKylW2 ApplicationPassword: secure: zV3r4bwG65rWRfF1L23RYLj7GXVxsMdZtasCsX0+pYA= - Add the environment variables to the AppVeyor project settings.
- If you just did the previous section, then you should have the correct page
already up and can skip this step.
- Go to the Project tab.
- Click on the project name ‘DscConfigurationExample’
- Click on Settings.
- Click on Environment.
- Add environment variable ‘TenantID’.
- Under Environment variables, click Add variable.
- In the Name field, type TenantId.
- In the Value field, type the value for tenant id that you save in the previous step.
-
Hover over the Value field and then click on the lock icon next to it to make it a encrypted value.
Note: If the value is not secure (encrypted), then anyone sending in a pull request (PR) could compromise your variables. Environment variables that are encrypted will not be available for a pull request (PR).
-
Repeat the previous step for the following environment variables, and make sure to secure each value. Use the values you saved in the previous steps.
- SubscriptionID
- ApplicationID
- ApplicationPassword
- Click Save.
- If you just did the previous section, then you should have the correct page
already up and can skip this step.
Modify repository files
Modify module manifest
Rename the module folder and the module manifest file
- Go back to your project in Visual Studio Code (or whatever editor you are using).
- Rename the folder ‘TemplateConfigModule’ to ‘DscConfigurationExampleModule’.
- Rename the module manifest ‘TemplateConfigModule.psd1’ to ‘DscConfigurationExampleModule.psd1’
Note: The folder name and module manifest file name must have the same name as the repository name, and the folder name must end with ‘Module’.
Modify the content of the module manifest
For more information regarding how to write a module manifest, please see the article How to Write a PowerShell Module Manifest and you can also use the cmdlet New-ModuleManifest to create a module manifest.
For this exercise we just change the values in the existing module manifest we just renamed.
- Open the module manifest file ‘DscConfigurationExampleModule.psd1’.
- Change the value for property ModuleVersion to ‘1.0.0.0’.
- Run the cmdlet
New-Guidand change property GUID to the GUID that you got from the cmdlet. -
The property RequiredModules must be changed to the value below
RequiredModules = @('PSDscResources','xComputerManagement')Note: The property RequiredModules is mandatory, because it is used to make sure the user has the correct module loaded, but more important for us it is used during testing to load the correct modules into the test environment.
-
The property WindowsOSVersion is not a property that is part of the normal module manifest elements. This property has been added to the PrivateData hash table for the purpose of determine which operating systems the tests should run on. Let’s change this to property to limit testing on Windows Server 2012 R2 and Windows Server 2016.
WindowsOSVersion = '2012-R2-Datacenter','2016-Datacenter'Note: Please set this to the Sku for all operating systems your configuration supports. If you want to find out which Sku are available then read How to find Windows VM images in the Azure Marketplace with Azure PowerShell.
-
Change the values in the rest of the properties to something appropriate. Properties that are commented are optional. They can be removed if not used.
Author = 'My Name'
CompanyName = 'My Company/My Name'
Copyright = '(c) 2017 My Company/My Name. All rights reserved.'
Description = 'This module contains my PowerShell DSC solution'
LicenseUri = 'https://github.com/USERNAME/DscConfigurationExample/blob/master/LICENSE'
ProjectUri = 'https://github.com/USERNAME/DscConfigurationExample'
Note: Some of the properties are required to publish a module to PowerShell Gallery. Read more in the section Sharing relies on completing important metadata in the DscConfiguration repository.
Add a README to the module
The tests require that a README.md exist in the module folder.
- Create a new file named ‘README.md’ under the folder DscConfigurationExampleModule.
-
In the new markdown file add the below markdown text.
# DSC Configuration Example

This module contains an example for a DSC Configuration
Modify Configuration Data
The configuration data files contains the properties used by each of the configurations.
First target node configuration file
- Rename configuration data file ‘TemplateConfig.ConfigData.psd1’ to ‘FirstTargetNode.ConfigData.psd1’.
-
Open the newly rename file and change the code to this.
@{
    AllNodes = @(
        @{
            NodeName  = 'localhost'
            GroupName = 'Group1'
         }
    )
}
Second target node configuration file
- Create a new file named ‘SecondTargetNode.ConfigData.psd1’.
-
Open the new file and add this code to it.
@{
    AllNodes = @(
        @{
            NodeName  = 'localhost'
            PowerPlanName = 'High performance'
        }
    )
}
Modify Configuration
The configuration files is compiled and ran on the target nodes. They hold the actual configuration that should be applied to the target nodes.
Prepare the configuration file
We remove the configuration file that came with the template, and then we create a new file which holds our configuration for both target nodes.
- Remove the file named ‘TemplateConfig.ps1’.
-
Run the following in a PowerShell session to create a new file with the correct name. Replace these values to the correct values (you could also edit them later in the resulting file).
$newScriptFileInfoParameters = @{
    Path = 'C:\source\DscConfigurationExample\DscConfigurationExample.ps1'
    Version = '1.0.0.0'
    Author = 'My Name'
    Description = 'Configurations to configure to target nodes'
    CompanyName = 'My Company/My Name'
    Copyright = '(c) 2017 My Company/My Name. All rights reserved.'
    Tags = @('DSC', 'Config')
    ProjectUri = 'https://github.com/USERNAME/DscConfigurationExample'
    LicenseUri = 'https://github.com/USERNAME/DscConfigurationExample/blob/master/LICENSE'
    RequiredModules = @('PSDscResources', 'xComputerManagement')
}

New-ScriptFileInfo @newScriptFileInfoParameters
First node configuration
- Open the file ‘DscConfigurationExample.ps1’ that was created above.
-
At the end of the file you will find the following code.
<# .DESCRIPTION Configurations to configure to target nodes #> Param() -
Replace the above block with this code
<#
    .DESCRIPTION
        Configuration to configure the first target node
#>
Configuration FirstTargetNode
{
    Import-DscResource -ModuleName 'PSDscResources'

    Node $AllNodes.NodeName
    {
        Group TestGroup
        {
            Ensure    = 'Present'
            GroupName = $Node.GroupName
        }
    }
}
Note: The named used for the configuration must be equal to what was used for the configuration data file for the first target node.
Second node configuration
- Open the same file ‘DscConfigurationExample.ps1’ that was changed above.
-
At the end of the file add the following code.
<#
    .DESCRIPTION
        Configuration to configure the second target node
#>
Configuration SecondTargetNode
{
    Import-DscResource -ModuleName 'xComputerManagement'

    Node $AllNodes.NodeName
    {
        xPowerPlan ChangePowerPlanToHigh
        {
            Ensure    = 'Present'
            GroupName = $Node.GroupName
        }
    }
}
Note: The named used for the configuration must be equal to what was used for the configuration data file for the second target node.
AppVeyor Testing
AppVeyor build worker
We would like to use the latest build worker for our testing. So let’s update appveyor.yml to use the latest build worker.
Note: You can find out which build worker exist in the AppVeyor documentation Build worker images.
-
Open the file appveyor.yml and add the below line directly after the Version dictionary.
image: Visual Studio 2017the result of the first three lines should look like this
version: 1.0.{build}.0
image: Visual Studio 2017
clone_folder: c:\projects\$(APPVEYOR_PROJECT_NAME)
Azure location for resource provisioning
We need to tell in what location we want to provision resources in Azure.
-
Open the file appveyor.yml and add the below line directly after the BuildID dictionary. Change the location name to something that fits your needs.
Location: westeurope
Workaround for AppVeyor testing
Note: This will be updated as soon as we get this fixes merged!
There are bugs in the current version of the test framework (DscConfiguration.Tests). The fixes for these bugs has not yet been reviewed and merged, so for that reason we need to use a branch in my fork that includes these bug fixes. My working branch is based on @PlagueHO’s branch, which is awaiting review and I’m waiting for that pull request (PR) to merge before being able to send in a pull request (PR) based on my working branch.
So the working branch we need to use is fixes-issues in my fork.
-
Open the file appveyor.yml and find the following line.
- git clone https://github.com/powershell/dscconfiguration.tests -
Replace that line with the below code. When the tests are run this will clone my fork, and then checkout the correct working branch.
- git clone https://github.com/johlju/DscConfiguration.Tests
- ps: Push-Location
- ps: cd "$env:APPVEYOR_BUILD_FOLDER\DscConfiguration.Tests"
- git checkout fixes-issues
- ps: Pop-Location
Run the tests
Run the tests in AppVeyor
Push changes to repository
Since we connected AppVeyor to our repository, the only thing we need to do is to commit all changes and push to the repository.
Note: You can also commit and push directly from Visual Studio Code if you are using that.
-
Open a PowerShell session and run the following. This will stage all new and changed files, and commit them with the commit message. And after that we push the commit to the branch master in the repository DscConfigurationExample.
cd c:\source\DscConfigurationExample
git add .
git commit -m "First version of DscConfigurationExample"
git push origin master
View test run in AppVeyor
- Browse to the projects in AppVeyor.
- Click on the project DscConfigurationExample.
You should now see the test being run in the Console as soon as it starts.
Complete example
You can find the complete working example here in the repository DscConfigurationExample. And in this build in AppVeyor you can se how it should look like when tests are run.
Issues with this blog post
If you find any issues with this blog article please comment, or submit an issue at the blog repository.
Related links
- You can read more about Desired State Configuration (DSC) in the article Windows PowerShell Desired State Configuration Overview.
Leave a comment